That blank wall staring back at you? It’s not just empty space—it’s a canvas waiting for your story. Figuring out how to arrange photos on a wall is the art of turning that empty space into a personal, beautiful statement. With a clear vision and a layout that fits your style, you can create a display that brings your most treasured memories to life.
Designing a Photo Wall That Feels Like You
Before you pick up a hammer, take a moment to imagine the feeling you want your photo wall to create. This isn't just about filling space; it's about curating an experience that reflects your personality and the moments that have shaped you.
Are you envisioning a warm, bustling family chronicle above the sofa, filled with candid laughter and precious milestones? Or perhaps you dream of a serene, contemplative collection of travel memories lining a quiet hallway. Defining this mood is your crucial first step—it will guide every decision you make, from the photos you select to the very texture and color of the frames you choose.
Find Your Unifying Theme
A theme is the invisible thread that weaves your collection together, transforming a group of pictures into a cohesive story. It doesn’t have to be rigid, but it should give your arrangement a clear sense of purpose. Think about the narrative you want your wall to share.
Here are a few ideas to get you started:
- A Timeline of Life: Arrange photos chronologically to map out your family's growth, a couple's journey, or a child's early years. This creates a powerful, unfolding story right on your wall.
- Travel Adventures: Dedicate the wall to your favorite trips. I love seeing sweeping landscapes mixed with candid street shots and portraits—it gives the whole display a dynamic, adventurous energy.
- A Color Story: Tie your photos together with a consistent color palette. A collection of black-and-white images feels timeless and artistic, while photos with dominant blues and greens can bring a tangible sense of calm to a room.
A well-curated photo wall does more than decorate a space; it infuses it with personality and warmth, making a house truly feel like a home. It’s an everyday reminder of the people, places, and moments that matter most.
Curate with Heart
Once you have a theme, it’s time for the most enjoyable part: selecting your photos. Step into the role of curator for your own personal gallery. Don’t just look for the "perfect" shots. Choose the images that spark an emotion—the ones that make you smile, remember, and truly feel something. By mixing posed portraits with candid, in-between moments, you create a display that feels authentic and alive.
This move toward deep personalization is reshaping how we approach interior design. The global wall art market is projected to grow from USD 66.89 billion to USD 145.49 billion by 2034, driven by our collective desire for more meaningful and flexible decor.
This shift shows that knowing how to arrange photos on a wall is becoming a key skill for anyone wanting decor that can evolve with their life. For those of us who love to refresh our spaces, exploring the benefits of changeable picture frames can be a true game-changer.
Mastering Gallery Wall Layouts and Compositions
With your photos selected, the real creative work begins. Here, you transition from curator to designer, figuring out how to arrange photos on a wall in a way that feels balanced, intentional, and completely you. Your choice of layout is critical; it sets the tone and transforms individual pictures into a single, stunning work of art.
Let's walk through the most popular approaches to composing a gallery wall. Consider this your playbook for creating a display that tells your story perfectly. Whether you're drawn to clean, orderly lines or a more organic, free-flowing vibe, there's an arrangement that will feel just right for your space.
Choosing Your Layout Style
The structure of your gallery wall is its skeleton, and each style creates a completely different mood. Understanding the two main approaches is the first step in deciding what best fits your home and your collection of memories.
-
The Symmetrical Grid: This layout is all about clean lines, precision, and a powerful sense of order. It works beautifully with frames of the same size and style, spaced with perfect uniformity. The result is a modern, polished look that makes a strong, unified statement—ideal for a series of professional portraits or a collection of black-and-white travel shots.
-
The Asymmetrical Salon-Style: If you love a more collected, eclectic feel, this is your perfect match. Salon-style layouts are organic and free-form, giving you the freedom to mix different frame sizes, orientations, and even textures. This approach is wonderfully forgiving and personal, making it perfect for blending family photos with art prints, your child’s drawings, or other meaningful mementos.
A fantastic tip for any layout is to maintain a consistent space of 2 to 3 inches between each frame. This gives the arrangement breathing room and prevents it from feeling cluttered, even in an eclectic salon-style display.
The Anchor Piece: Your Key to Balance
Regardless of the layout you choose, every great gallery wall has an anchor piece. This is typically your largest or most compelling photo, and it serves as the focal point that holds the entire composition together. Avoid the temptation to place it directly in the center; positioning it slightly off-center encourages the eye to move more naturally across the whole display.
Once your anchor is placed, you can build out from there. A little trick designers use is to place the second-largest piece diagonally from the first. This creates an immediate sense of balance and provides a solid foundation for filling in with smaller frames.
Common Gallery Wall Layouts at a Glance
Visualizing how these layouts might look in your home can be challenging. Here’s a quick comparison to help you choose the best fit for your space and your photo collection.
| Layout Style | Best For | Key Characteristics | Pro Tip |
|---|---|---|---|
| Symmetrical Grid | Formal spaces, cohesive photo sets (like a black & white series), and modern homes. | Uniform frame sizes and styles, precise and even spacing, clean lines. | Use a level and a measuring tape religiously. The power of this look is in its perfection. |
| Asymmetrical | Casual living rooms, stairways, and eclectic collections that mix photos with art. | Varied frame sizes, orientations, and styles; feels organic and collected over time. | Start with your largest "anchor" piece off-center and build around it with smaller items. |
| Salon Style | Large, dramatic walls where you want to make a bold statement with a diverse collection. | A denser, floor-to-ceiling version of the asymmetrical layout, often mixing in non-framed items. | Lay everything out on the floor first! Perfect the arrangement there before you even think about picking up a hammer. |
This table offers a clear starting point, but remember, these are just guidelines. The most compelling layouts often borrow elements from different styles to create something truly personal and unique to you.
Mix and Match with Intention
Choosing an eclectic, salon-style wall doesn't mean hanging things at random. The secret to a beautiful, mixed arrangement is finding a common thread to tie it all together. This touch of consistency is what prevents your wall from looking chaotic and makes it feel intentionally curated.
Here are a few ways you can create that cohesive look:
- Unified Frame Color: You can use a wild mix of frame styles—ornate, modern, thin, thick—as long as you keep them all in the same color family. Think all black, all white, or all gold frames.
- Consistent Matting: If your frames are all different, try using the same color matboard for every photo. A crisp white mat can instantly pull together even the most diverse collection of frames.
- A Shared Color Palette: Pick out a few key colors from your main anchor piece and ensure those tones appear in the other photos or artwork on the wall.
Ultimately, the best way to figure out how to arrange photos on a wall is to play. Lay your frames on the floor and move them around until the composition just feels right. This is your story, after all.
How to Measure and Map Your Layout Like a Pro
The secret behind every stunning gallery wall isn't some innate designer's intuition—it's just a bit of thoughtful preparation. This is where you grab a measuring tape and create a foolproof plan before a single nail touches the wall. Trust me, spending a few minutes here will save you so much frustration later.
Think of this process as creating a blueprint for your art. It removes all the guesswork, prevents those extra nail holes, and makes the actual hanging process surprisingly calm and enjoyable. With a few simple measurements, your vision will translate flawlessly from your mind to your wall.
Finding Your Center and Setting the Height
Before planning the placement of individual frames, you need to establish your anchor point. First, find the horizontal center of the wall space you're using. If you're arranging photos above a sofa or console table, simply find the center of that piece of furniture and mark it lightly on the wall with a pencil.
Next comes the single most important measurement for achieving a professional look: the height. Most interior designers follow the 57-inch rule. This means the center of your entire gallery arrangement should be 57 inches from the floor. Why 57 inches? It represents the average human eye level, making it the most comfortable and natural height for viewing art.
Pro Tip: If you're hanging one large piece, its direct center should be at 57 inches. For a gallery wall, it's the center of the entire grouping that should hit that 57-inch mark. This keeps your collection feeling grounded and intentional.
This simple guideline helps you avoid the most common mistake: hanging art too high, which can make a room feel disconnected. It’s a small detail that makes a world of difference.
The Paper Template Method: A Total Game-Changer
This is the trick that will save you time, headaches, and your walls. The paper template method allows you to visualize your entire layout on the wall, completely risk-free. No "oops" moments here.
Here’s how you do it:
- Trace and Cut: Lay each of your frames face-down on craft paper or old paper grocery bags. Trace around them and cut out the shapes.
- Mark the Hanger: This step is crucial. Before moving the frame, flip it over and measure exactly where the nail or hook is located on the back. Mark this spot directly on your paper cutout. This is your precise hanging point.
- Arrange on the Wall: Using painter's tape, which won't damage your walls, stick your paper templates up. Now the fun begins! You can play with the arrangement, step back, and see exactly how it will look. Move things, adjust spacing, and perfect your composition without making a single permanent mark.
Once you are 100% happy with the layout, you'll know exactly where each nail goes. Simply hammer it right through the marked spot on your paper template, then gently tear the paper away.
Whether you’re aiming for a clean, symmetrical grid or a more eclectic salon style, mapping it out first is the key to getting it right.
Spacing and Final Checks
Consistent spacing is what separates a polished gallery wall from a chaotic one. As a rule of thumb, keep 2-3 inches of space between each frame. This gives every photo enough room to breathe while ensuring the collection feels like a cohesive unit.
Use your measuring tape to double-check the distance between your paper templates, nudging them until the spacing feels even and balanced.
For the final step, grab a level. Make sure your key horizontal and vertical lines are perfectly straight. This last check guarantees that all your careful planning results in a flawless, professional-looking display you’ll love for years to come.
Choosing Frames That Elevate Your Photo Collection
A frame is so much more than a border; it’s a critical design choice that unifies your entire gallery wall and brings your photos to life. It sets the mood, adds texture, and can transform a simple picture into a true piece of art. Getting this right is a key step in learning how to arrange photos on a wall with a professional touch.
Your frame choices should enhance your photos while harmonizing with your room’s decor. A great frame never overpowers the image it holds—it supports it, just as a beautiful score supports a film.
Match Frame Material to Your Vibe
The material of your frame has a huge impact on the final look. Each one brings its own distinct personality to your wall, so think about the feeling you want to create.
- Classic Wood Frames: The soft grain and natural finish of wood bring an immediate sense of warmth and timelessness. A light oak or maple frame feels organic and modern, while a darker walnut or mahogany finish leans more traditional and formal.
- Sleek Metal Frames: For a contemporary, clean look, you can't go wrong with metal. Thin black or brass frames are incredibly popular for their minimalist appeal, allowing the photograph itself to take center stage.
- Ornate and Vintage Frames: If your style is more eclectic or romantic, don't be afraid to hunt for unique, decorative frames. A touch of gold or an intricate, carved pattern can add a layer of sophistication and personal history to your collection.
The choice between a rustic wood and a sharp metal frame can completely change the emotional tone of your photo arrangement.
The Art of Mixing and Matching
One of the most engaging ways to arrange photos on a wall is by mixing different frame styles. An eclectic, collected look feels personal and authentic, as if each piece was acquired over time. Of course, there’s a fine line between curated charm and pure chaos.
To keep your mixed-frame gallery wall feeling cohesive, stick to a unifying element. This could be a consistent color palette—for instance, mixing various styles of black, white, and gold frames. Or, you could use different frame finishes but keep the matting a consistent crisp white for every photo. This creates a common thread that ties everything together beautifully.
Your frames are the punctuation in your wall's visual story. A mix of styles adds rhythm and interest, but a shared color or matting provides the grammatical structure that makes it all readable and pleasing to the eye.
The framing industry itself continues to grow, showing just how much we value these finishing touches. The global picture frame market, valued at USD 9,300 million in 2022, is projected to climb to USD 14,676.57 million by 2031. This steady rise highlights a deep appreciation for how frames elevate our most cherished memories from simple snapshots to decorative centerpieces.
Embrace Flexibility with Modern Systems
While traditional framing is beautiful, modern solutions offer a new level of creative freedom. Systems like FrameStory are designed for people who love to refresh their decor without the hassle and waste of buying entirely new frames.
Imagine having a single, high-quality aluminum frame that allows you to change the entire look in minutes. With a system built around dye-sublimated fabric prints, you can swap your image from a classic Portrait style with a visible border to a stunning Edgeless look that bleeds to the very edge. This flexibility is perfect for seasonal updates or simply when you want a fresh perspective. You can explore more about how framed fabric wall art is changing home decor.
This approach means your investment is in the durable, lasting frame, while the prints themselves become an interchangeable part of your decor library. It’s a sustainable and dynamic way to keep your walls telling new stories, making the process of how to arrange photos on a wall an ongoing, joyful act of creation.
Hanging Your Photos Securely and Flawlessly
You've planned your layout and chosen the perfect frames. Now for the most satisfying part: bringing it all to life on your wall. This is where your vision becomes reality, and the right hanging technique is what keeps your gallery wall looking flawless for years to come.
Getting this right isn't just about preventing crooked frames. It’s about protecting your walls, your frames, and the memories they hold. Good hardware means peace of mind, so you can just step back and enjoy the view.
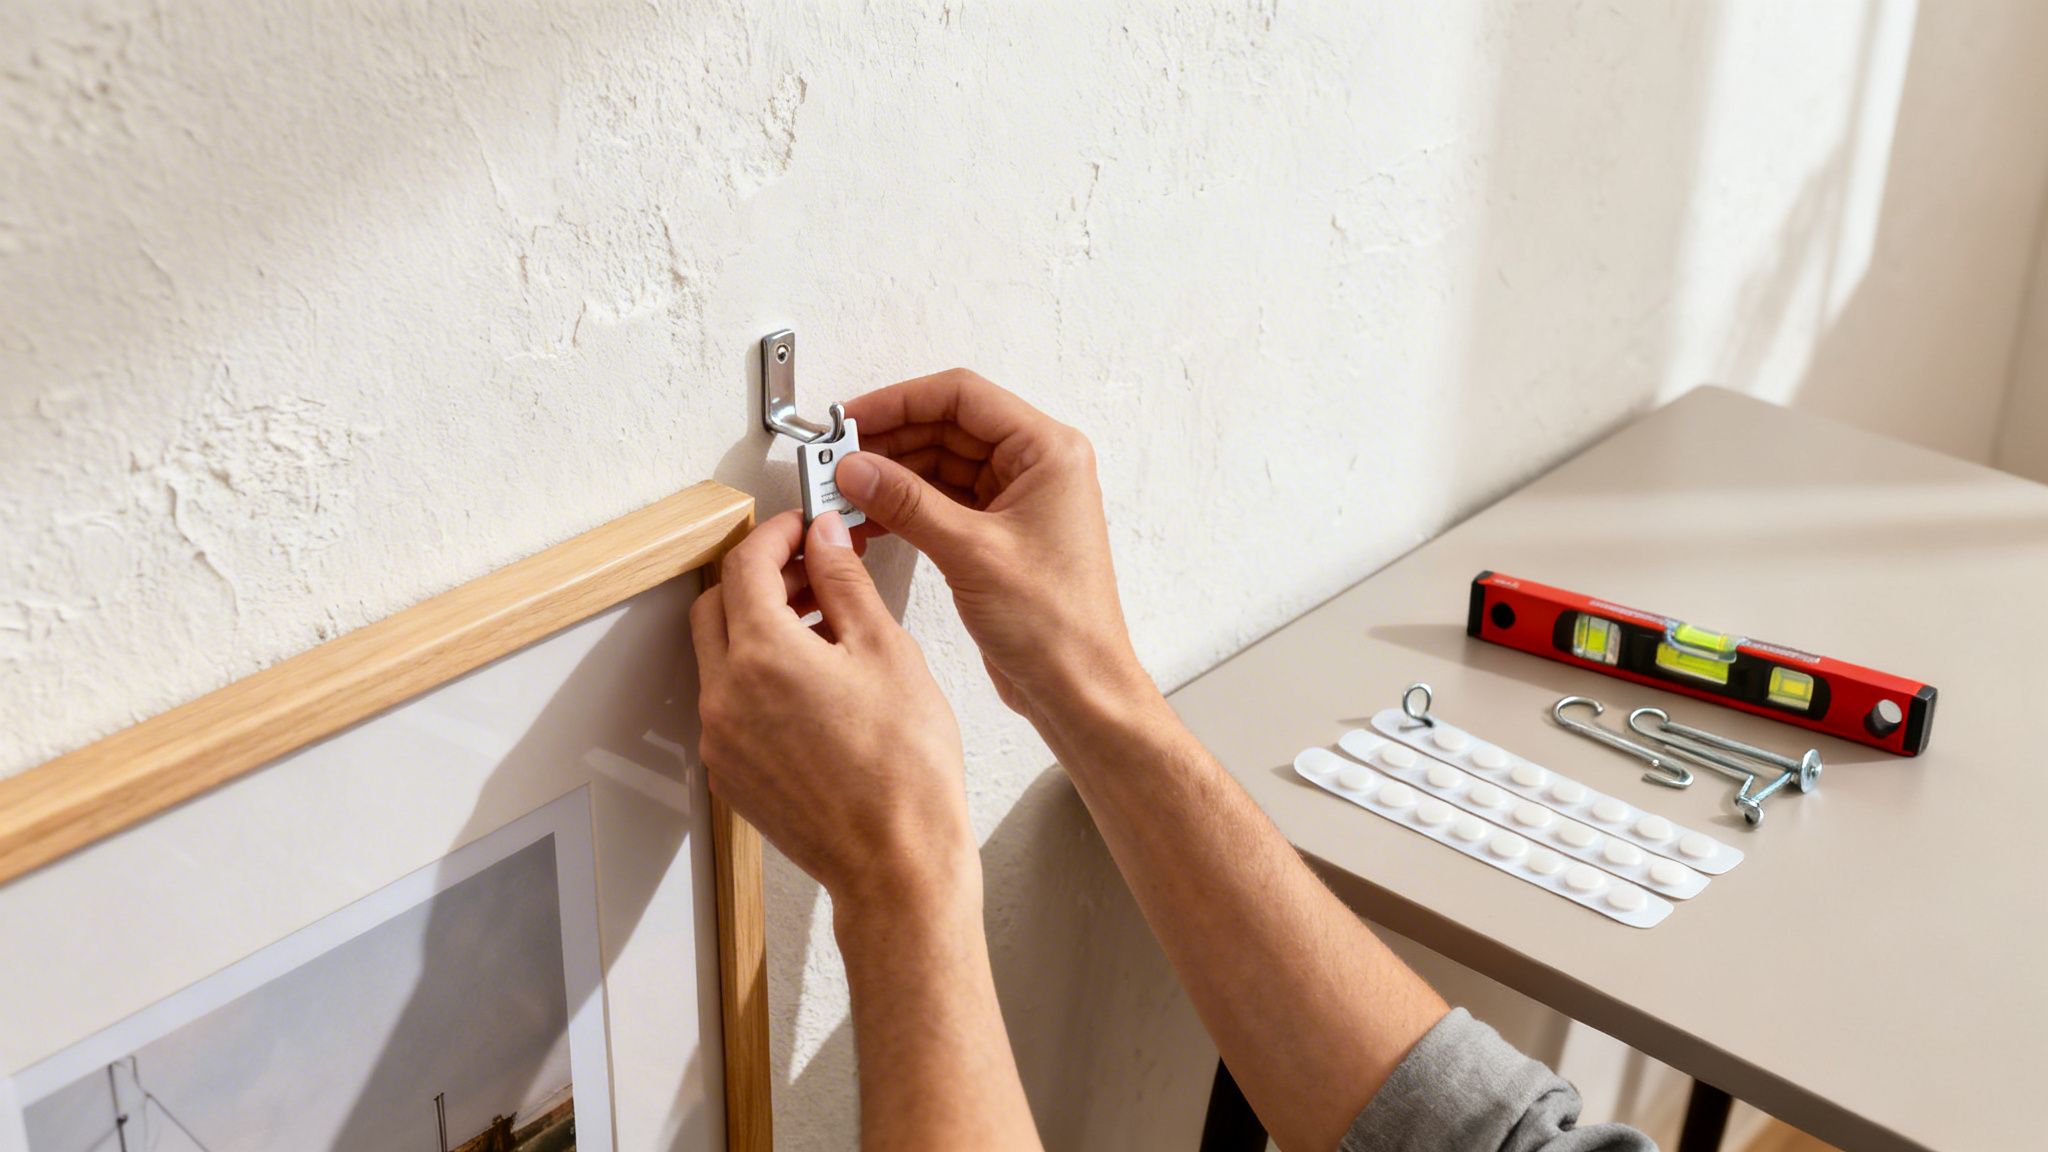
Choosing the Right Hardware for Your Walls
The world of picture-hanging hardware can feel a little overwhelming, but it really just comes down to your wall type and frame weight. Most modern homes have drywall, which is pretty straightforward, but older homes can throw you a curveball with plaster.
For Standard Drywall Walls:
- Traditional Picture Hooks: These are the gold standard for a reason. A simple nail-and-hook combo is perfect for most frames up to 20-30 pounds. That angled nail provides a surprising amount of strength.
- Drywall Anchors: If you have a heavier piece (over 30 pounds), don't just cross your fingers with a nail. A plastic drywall anchor is designed to expand behind the wall, creating a much more secure grip for a screw.
For Plaster or Brick Walls:
- Drilling is a Must: You can't just hammer into these harder surfaces. You'll need to drill a pilot hole and use a wall plug specifically designed for masonry. It's one extra step, but it's absolutely crucial for a secure hang.
It’s clear people are looking for reliable ways to hang their art. The picture hanging system market is projected to hit USD 1.58 billion by 2031, growing at a steady 8.3% each year. This shows that a great photo arrangement depends just as much on quality hardware as it does on aesthetics.
Renter-Friendly and Damage-Free Solutions
What if putting holes in the wall isn't an option? Don't worry, you can absolutely create a stunning gallery wall without leaving a single mark. Modern adhesives have come a long, long way.
Forget what you think you know about temporary hooks. Today’s high-quality adhesive strips are designed to hold significant weight securely when applied correctly, making them a game-changer for renters and commitment-phobes alike.
Here’s the secret to making them work:
- Clean the Surface: Wipe the spot on the wall with isopropyl alcohol. This gets rid of any dust or oils that could mess with the bond.
- Check the Weight Limit: This is non-negotiable. Always use strips rated for a weight that's slightly above your frame's weight, just for extra security.
- Press and Hold Firmly: Follow the package directions to the letter, especially the part about pressing the strip firmly against the wall for at least 30 seconds.
- Let It Cure: Most adhesive strips need about an hour to fully bond before you hang anything on them. A little patience now prevents pictures from crashing down later.
For even more ideas on how to decorate without leaving a trace, check out our complete guide on how to hang pictures without damaging walls.
Achieving Perfect Precision
Okay, it’s time for the final execution. You've done all the prep work, so this part should be stress-free. If you used the paper template method we talked about earlier, your nail marks are already waiting for you.
If you're hanging without templates, here's a great little trick: put a tiny dab of toothpaste on the hanger on the back of your frame. Carefully position the frame exactly where you want it and press it lightly against the wall. The toothpaste leaves a perfect mark showing you precisely where the nail goes.
Your best friend for this last step is a small torpedo level. Use it to check that each frame is perfectly horizontal. If you’re doing a grid, use it to check your vertical and horizontal lines between frames, too. This final bit of attention to detail is what gives your arrangement that polished, professional look.
Common Questions About Arranging Wall Photos
You’ve got your plan and your prints are ready, but a few questions might still be nagging at you. Don't worry, you’re not alone. Figuring out how to arrange photos on a wall often comes with a few common puzzles.
Let's walk through some quick answers to get you over those last-minute hurdles, so you can hang your gallery with total confidence.
What Is the Best Height to Hang a Photo Gallery?
There’s a fantastic rule of thumb designers swear by: the "57-inch rule."
It’s simple: the center of your entire photo arrangement should hang 57 inches from the floor. Why? This height is the average human eye level, making it the most natural and comfortable viewing height for almost everyone. It just feels right.
If you’re hanging your collection above furniture like a sofa or a console table, there’s one more guideline. Aim to leave 6-8 inches of space between the bottom of the lowest frame and the top of the furniture. This crucial gap creates a visual link, making the art and the furniture feel like one cohesive unit instead of two separate things floating on the wall.
How Can I Mix Different Frames Without It Looking Messy?
The secret to mixing frames without the result looking chaotic is to find one unifying thread that ties everything together. This is what turns a random collection into a thoughtfully curated display.
Here are a few strategies that work beautifully every time:
- Stick to a Consistent Color Palette: You can absolutely mix ornate, modern, and minimalist frames if they share a color family. Think all black frames, a mix of warm wood tones, or a chic combination of white and gold.
- Use Uniform Matting: This is a total game-changer. If your frames are all different colors, materials, and styles, using the same crisp white mat in every single one will create instant harmony.
- Anchor the Arrangement: Start your layout with one large, dominant photo. By arranging the smaller, more varied frames around this central "anchor piece," you create a natural sense of order and balance for the whole display.
What Are the Best Damage-Free Ways to Hang Photos?
For renters, or really anyone who dislikes the idea of spackling holes, you have some excellent, sturdy options these days.
High-quality adhesive strips are my go-to recommendation. The key is to check the weight rating on the package and actually follow the instructions—especially cleaning the wall with rubbing alcohol first! It makes a huge difference in how well they hold.
Another brilliant damage-free strategy is to install one or two picture ledge shelves. You only have to make a couple of holes for the shelf itself, and then you have total freedom to lean, layer, and rearrange your frames as often as you like. It allows for endless creativity with minimal wall commitment.
How Far Apart Should I Space the Photos?
Consistent spacing is what gives a gallery wall that polished, intentional look.
As a general rule, a distance of 2-3 inches between each frame is the sweet spot. It gives each piece enough room to breathe while still feeling connected to the group. If you're going for a tight, symmetrical grid, you’ll want to be precise with this measurement. For a more relaxed, salon-style hang, you can vary it a little, but keeping it within that 2-3 inch range will keep the whole thing from looking sloppy or disjointed.
Ready to create a photo wall that's as flexible as your life? At FrameStory, we designed a system that lets you swap high-quality fabric prints in a single, durable frame. Change your decor from classic Portrait to modern Edgeless in minutes, keeping your walls fresh without the waste. Discover a smarter way to display your memories.